What is DNS and how does it work?
Are you a privacy-conscious netizen, on a perpetual quest to keep prying eyes off your online data? If so, congratulations on being proactive. But, as you cherish your privacy, it's essential to comprehend all the dangers lurking in the digital jungle. One such subtle yet significant concern is a DNS leak. Now, you might wonder, what's a DNS leak? Why should I care? Let's unpack this often overlooked issue that could potentially chip away at your online privacy shield.
What is DNS?
DNS stands for Domain Name System, which translates human-readable domain names (e.g., www.google.com) into machine-readable IP addresses (e.g., 192.0.xx.xx).
DNS acts as a mediator, facilitating the communication between your device and the web server hosting the website you want to access. When you visit a website, your device needs to know the IP address of the server hosting that site, and DNS resolves that for you.
How does DNS work?
When you enter a domain name into your web browser, your device checks its local cache to see if it already has the corresponding IP address. If it's not found in the cache, your device sends a DNS query to a recursive resolver (often provided by your internet service provider or a third-party DNS service). The recursive resolver then searches through various DNS servers to find the IP address associated with the domain name.

The type of DNS servers and how they works
DNS plays the role of an address book in a cell phone, specializing in recording the relationship between domain names and IP addresses. When we enter a domain name into a web page, DNS starts to look for the IP address of the domain name in the database, and the search process also goes through the cooperation of different servers of DNS.
The DNS hierarchy consists of multiple types of servers, with the highest level being the root servers. These root servers direct queries to the appropriate Top-Level Domain (TLD) servers (e.g., .com, .org) that maintain information for specific domain extensions. TLD servers then pass the query to authoritative DNS servers responsible for individual domain names.
The authoritative server responds with the correct IP address, passed back through the hierarchy until it reaches your device. This IP address is then used to connect with the web server hosting the website you wish to visit.
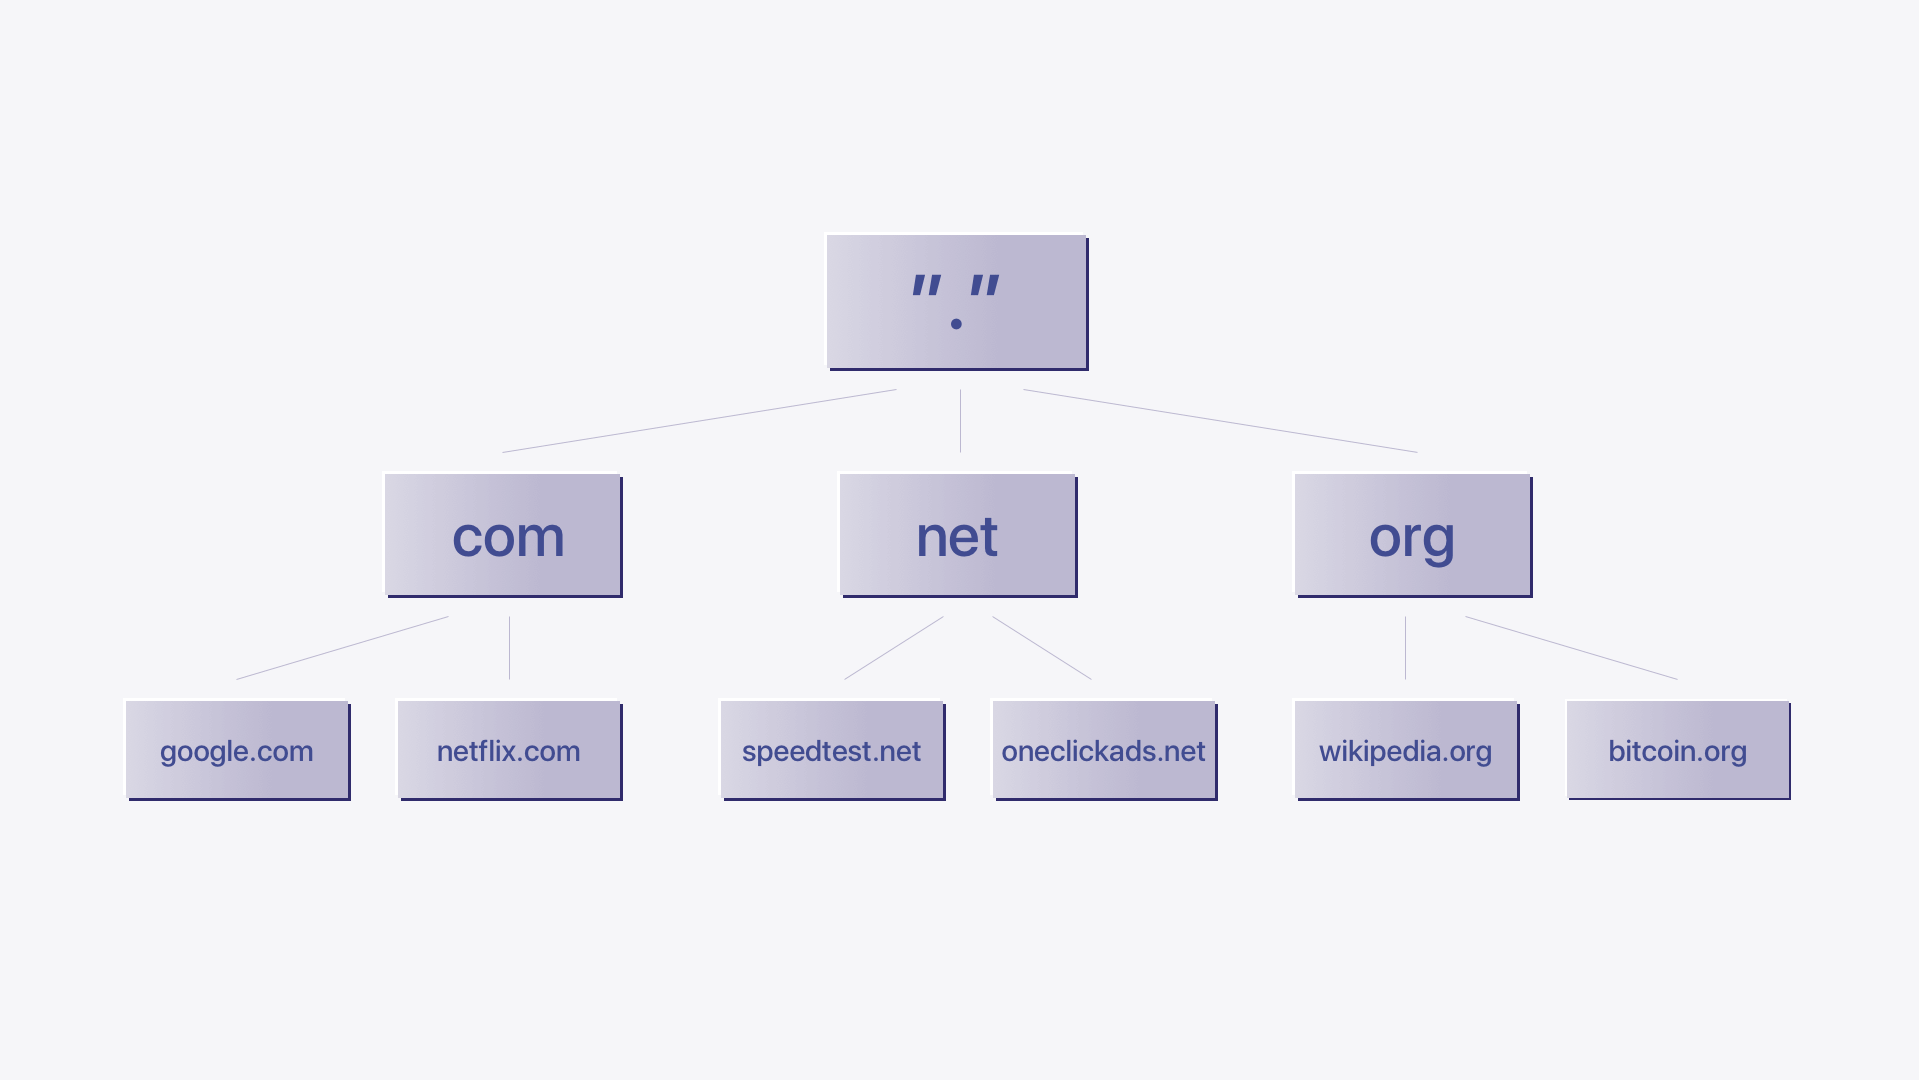
Root DNS servers: These are the top-level DNS servers in the DNS hierarchy. They are responsible for providing information about the authoritative servers for top-level domains (TLDs) like .com, .org, .net, etc. There are 13 sets of root DNS servers distributed globally.
TLD DNS servers: These servers are responsible for specific top-level domains, such as .com, .org, .net, etc. For example, the .com TLD server would be responsible for providing information about domains ending in .com.
Authoritative DNS servers: Authoritative DNS servers store the DNS records (such as A records, AAAA records, CNAME records, etc.) for specific domains. When a DNS query is made for a domain, the authoritative DNS server for that domain provides the IP address or other related information.
Recursive DNS servers: Also known as a resolver, the type of DNS server is used by internet service providers (ISPs) or other network administrators to handle DNS queries on behalf of their users. When you enter a website URL in your browser, your device queries the recursive DNS server, which then recursively resolves the domain until it reaches an authoritative DNS server and returns the IP address to your device.
The process of DNS resolution
The DNS resolution process involves several steps, typically involving interactions between multiple DNS servers.
Step 1: Local DNS cache lookup
When your device needs to resolve a domain name, it first checks its local DNS cache. The cache stores recently accessed domain names and the corresponding IP addresses to speed up future lookups. If the domain name is found in the cache and hasn't expired, the IP address is retrieved directly, and the process ends here.
Step 2: Recursive DNS servers
If the domain name is not found in the local cache or has expired, the next step is to contact a recursive DNS server. This is typically provided by your internet service provider (ISP) or a public DNS resolver like Google Public DNS or Cloudflare DNS.
Step 3: Recursive DNS server lookup
The recursive DNS server is responsible for performing the actual resolution process. If it doesn't have the IP address for the requested domain in its cache, it starts the resolution process from the root DNS servers.
Step 4: Root DNS servers
The root DNS servers are a crucial part of the DNS infrastructure. They are the top-level DNS servers in the hierarchical DNS system. There are 13 sets of root DNS servers distributed worldwide. The recursive DNS server queries one of these root servers to find out the authoritative DNS server responsible for the top-level domain (TLD) of the requested domain name (e.g., ".com" for "example.com").
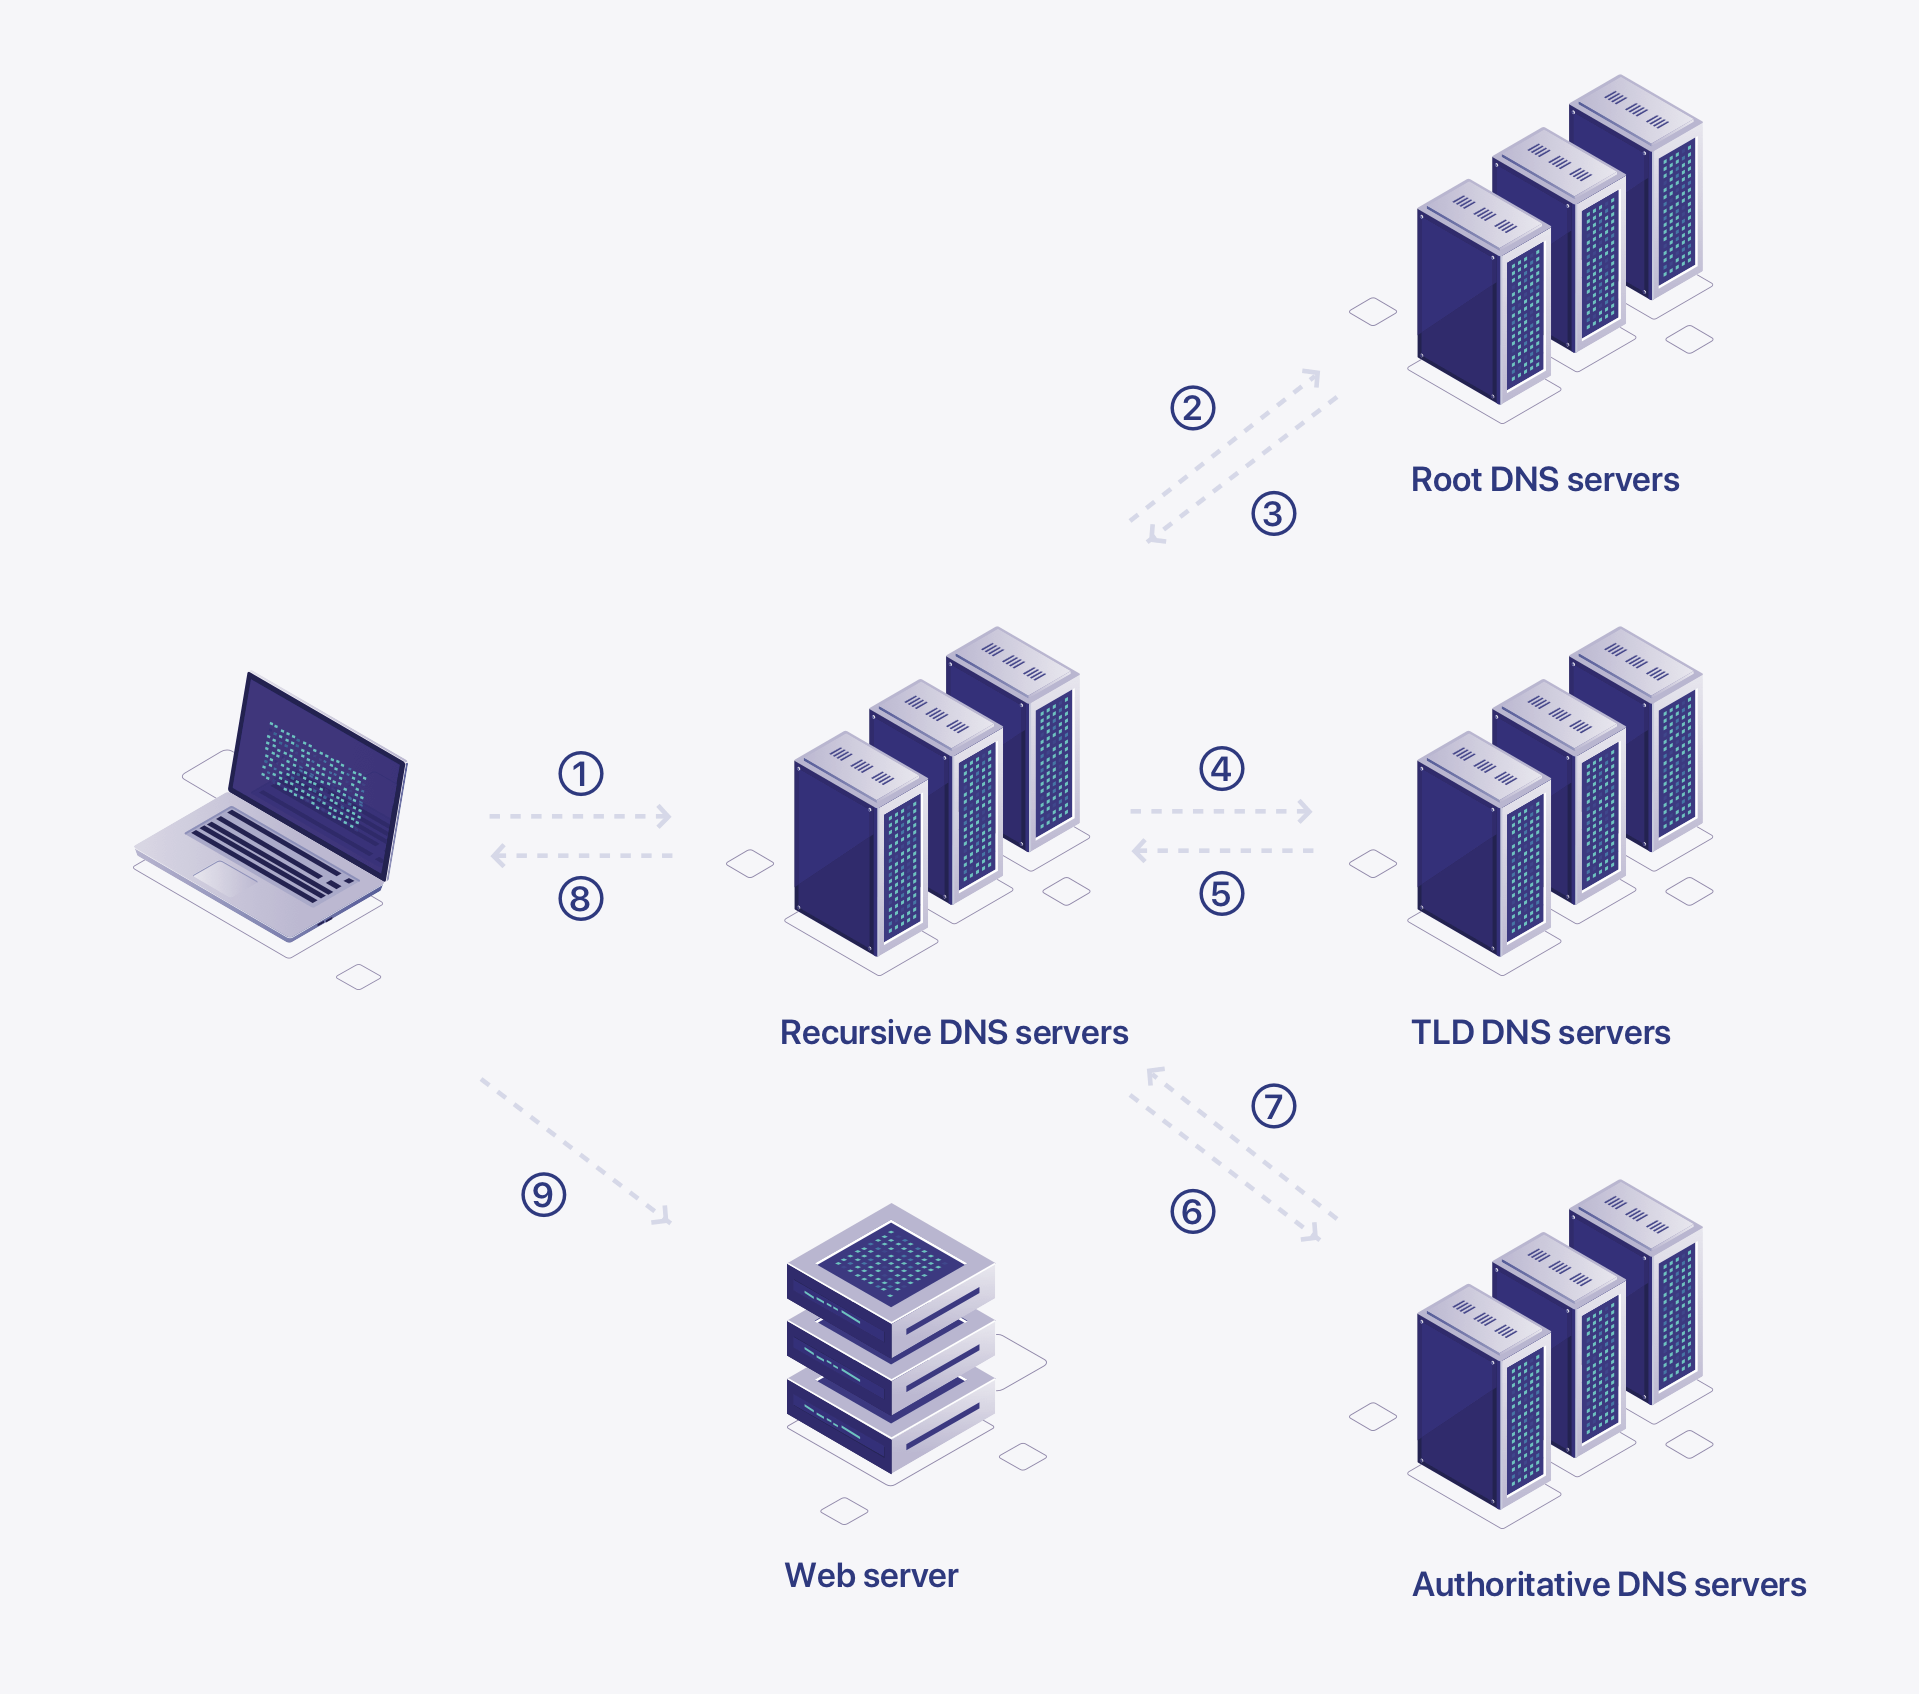
Step 5: TLD DNS servers
Once the recursive DNS server receives the IP address of the TLD DNS server responsible for the domain's extension (e.g., ".com"), it queries the TLD DNS server.
Step 6: Authoritative DNS servers
The TLD DNS server responds with the IP address of the authoritative DNS server for the specific domain name (e.g., "example.com"). This authoritative DNS server is managed by the domain owner or their DNS provider and has the most up-to-date information about the domain's DNS records.
Step 7: DNS record lookup
The recursive DNS server then queries the authoritative DNS server for the actual IP address associated with the domain name. The authoritative server responds with the IP address, and the recursive DNS server stores this information in its cache for future use.
Step 8: Response to your devices
Finally, the recursive DNS server sends the IP address back to your device, which can now use this IP address to establish a connection with the server hosting the requested resource (e.g., website, email server). And then you can enter the website as you like.
The entire DNS resolution process happens quickly and seamlessly, allowing you to access websites and other online services using easy-to-remember domain names. DNS caching at various levels helps improve the process's efficiency and reduce the load on the root DNS servers and authoritative DNS servers.
What is a DNS leak?
A DNS leak occurs when your device inadvertently bypasses the configured DNS resolver and sends DNS queries through another channel. In such cases, your DNS queries are exposed to an unintended third-party server, potentially your internet service provider (ISP), or other unauthorized entities.
The leakage can compromise your online privacy and security because these third parties can monitor and track your internet activities.
How does a DNS leak happen?
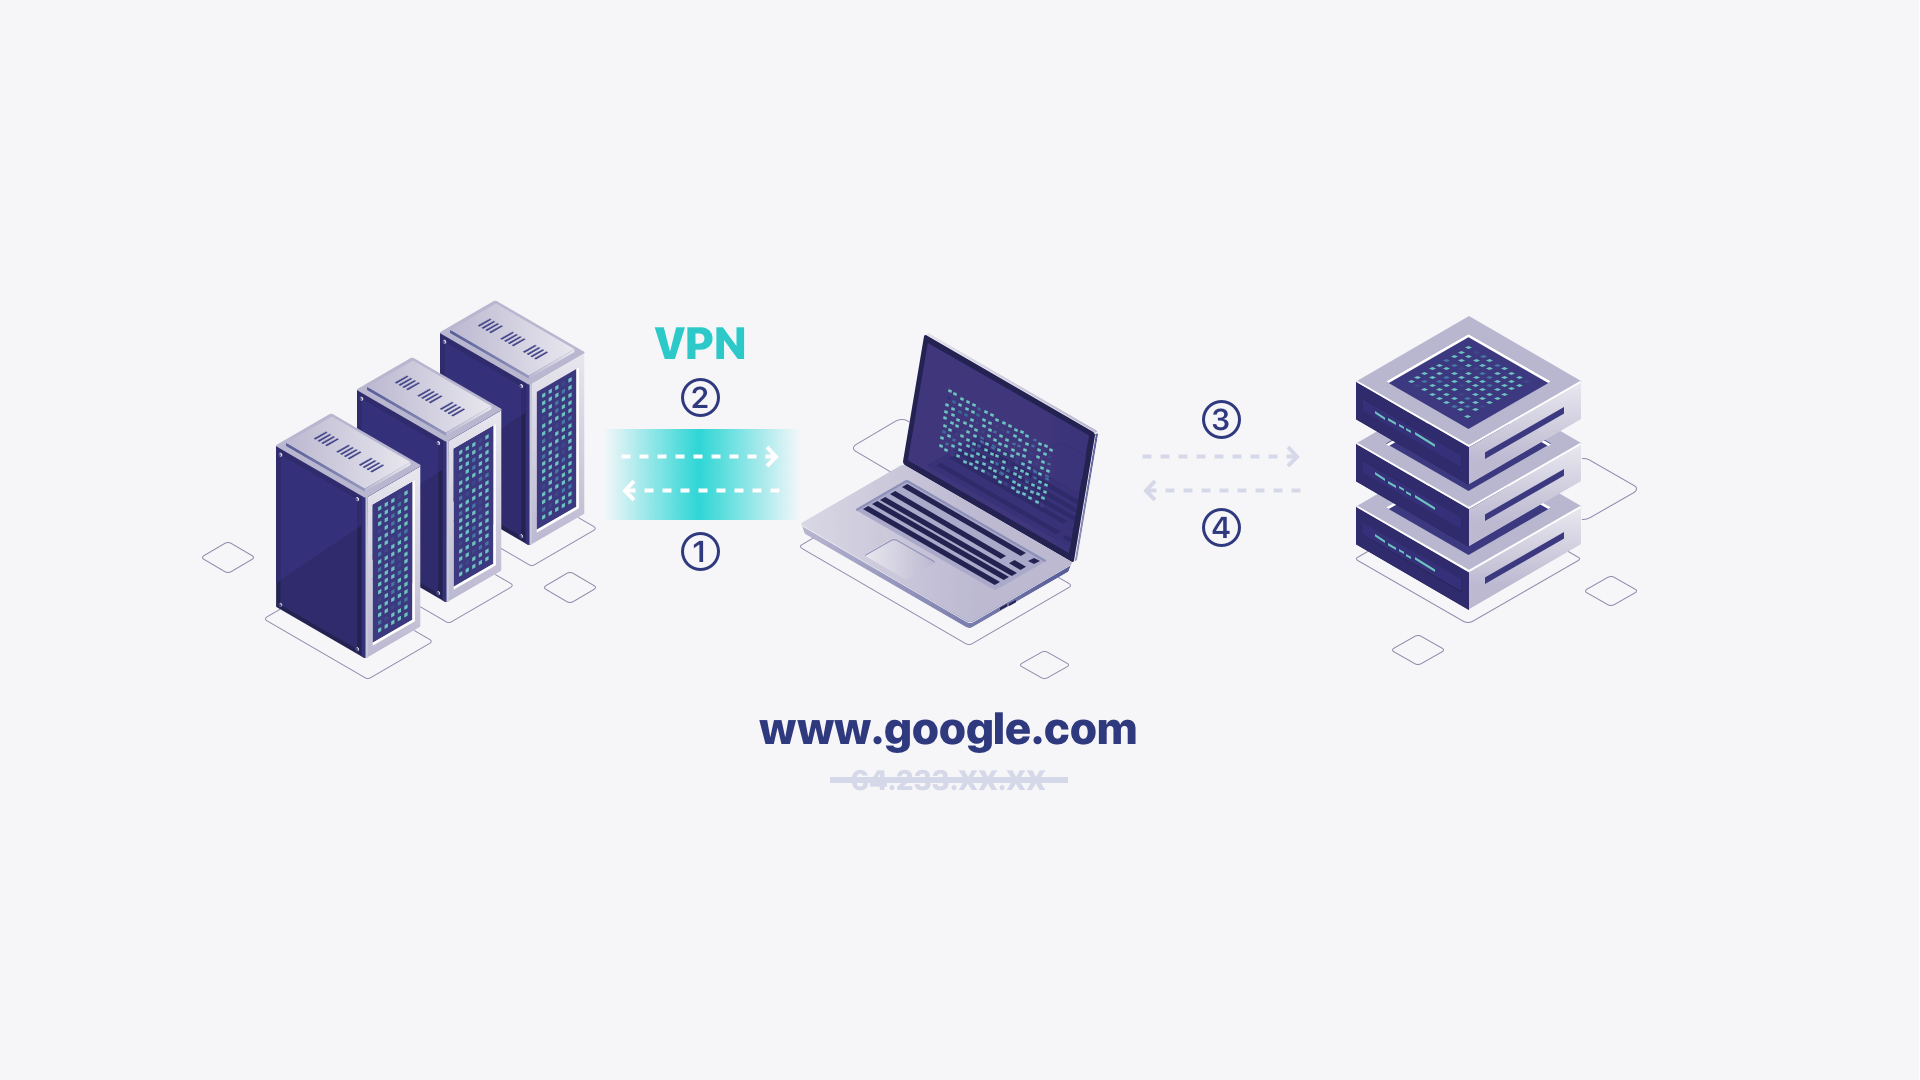
A DNS leak occurs when the DNS requests made by a user's device accidentally bypass the VPN tunnel and are sent directly to the ISP or another DNS resolver, revealing the user's online activities and potentially their IP address.
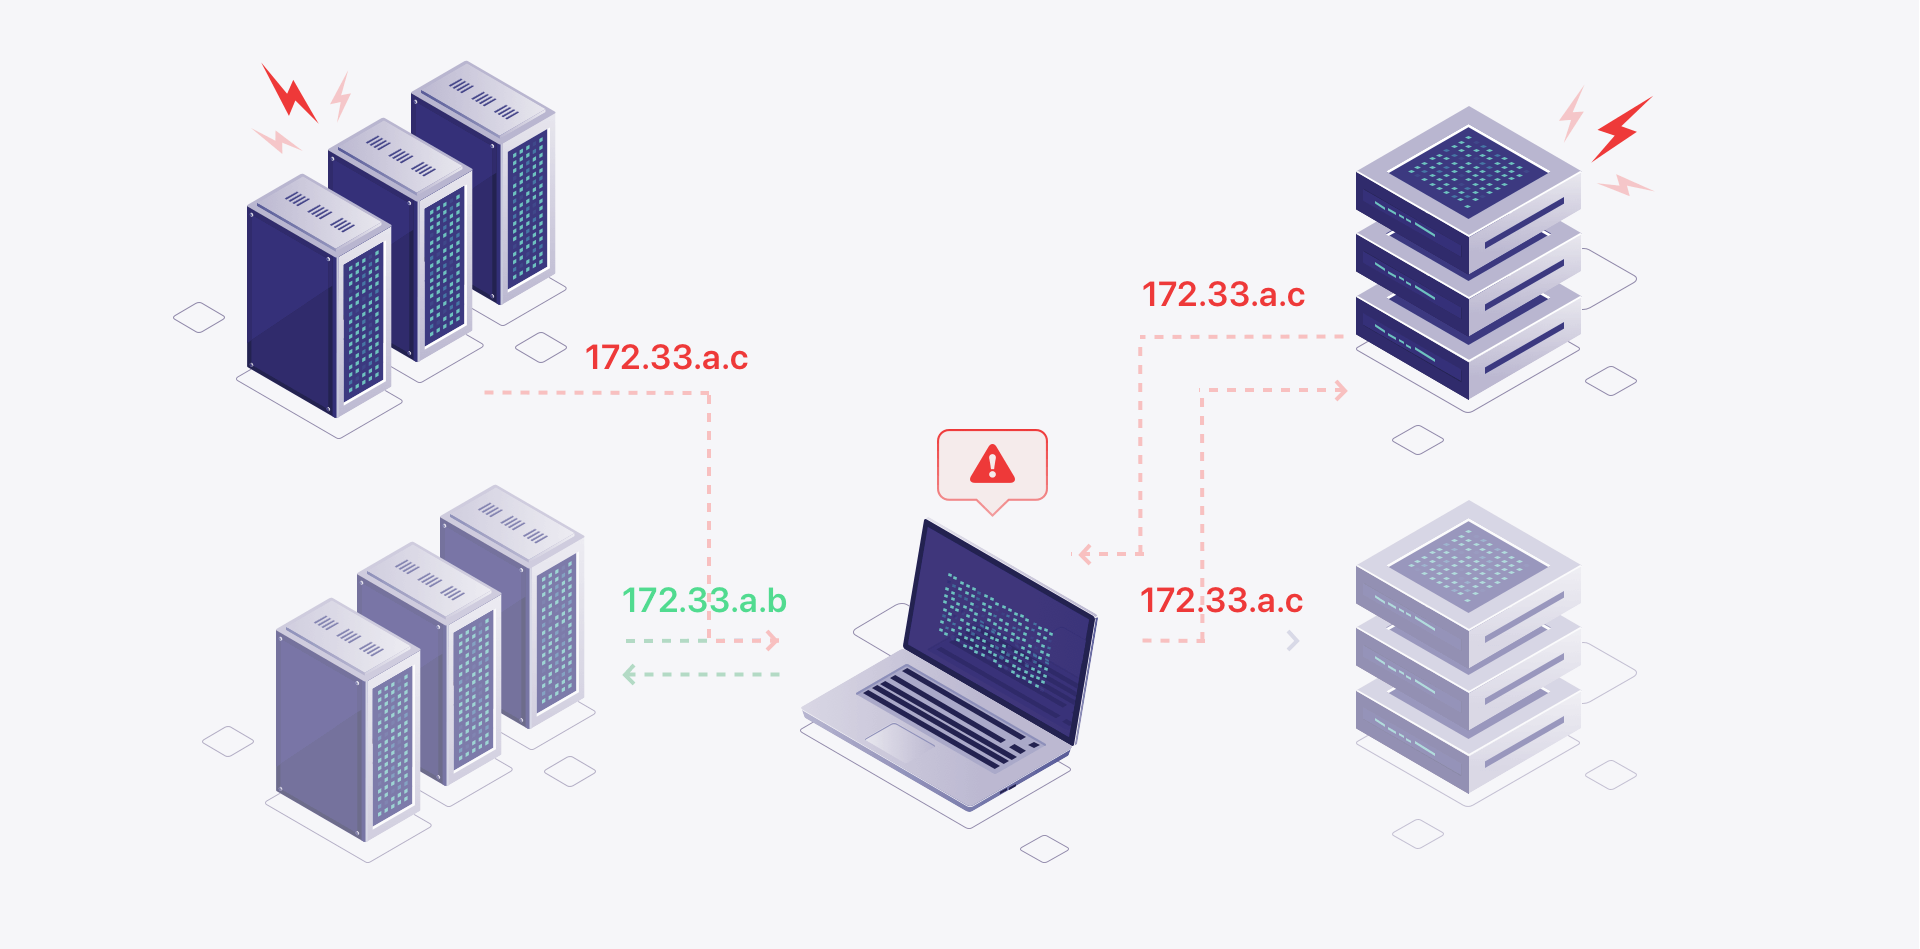
Step 1: You connects to a VPN
The user initiates a VPN connection to secure their internet connection and protect their privacy.
Step 2: DNS resolution
When the user tries to access a website or any online resource, their computer or device typically sends a DNS request to resolve the website's domain name into an IP address. This DNS request is meant to be routed through the VPN tunnel.
Step 3: Route configuration issue
Sometimes, due to misconfiguration or software bugs, your computer may fail to route the DNS request through the VPN tunnel. Instead, the request may follow the default network route, leading to the ISP's DNS resolver.
Step 4: A DNS leak occurs
The DNS request bypasses the VPN tunnel and reaches the ISP's DNS resolver or another DNS server, which can see your online activity and potentially log your IP address. It is known as a DNS leak.
Step 5: Exposure of online activity
Since DNS requests are outside the VPN tunnel, any website or service you visit may detect and log its IP address, defeating the purpose of using a VPN for anonymous browsing.
What causes a DNS leak happen?
1. Manual configuration of the VPN: When you manually configure a VPN in different systems, there is an increased risk of DNS leaks.
2. Misconfigured setup: A DNS leak occurs when your device accidentally or deliberately sends DNS requests outside the VPN tunnel, bypassing the VPN's DNS servers. Your ISP or other third-party DNS servers can see and log the websites you're visiting, even if the VPN encrypts your internet traffic.
3. Handling DNS requests: By default, your device's DNS requests (the translation of domain names to IP addresses) are usually handled by your ISP’s DNS servers. However, when you use a VPN, you expect your DNS requests to go through the encrypted VPN tunnel and be handled by the VPN provider's DNS servers for enhanced privacy.
Several factors can contribute to DNS leaks, such as an incorrectly configured VPN client, operating system settings, or the use of specific software applications. It is essential to regularly test for DNS leaks to ensure that all DNS requests are securely routed through the VPN tunnel. Suggest you must select a VPN with DNS leak protection.
Why should you care a DNS leak?
1. Privacy concerns: The main reason to use a VPN is to enhance your privacy and security online. A DNS leak undermines this purpose because your internet activities are exposed to your ISP or other potential snoopers, defeating the purpose of using a VPN to remain anonymous.
2. Bypassing geo-restrictions: People often use VPNs to access content or services unavailable in their region. DNS leaks can reveal your real location, and you may no longer be able to bypass geo-restrictions effectively.
3. Potential tracking and monitoring: Third-party DNS servers can log your DNS requests, leading to possible track of your online behavior and building a profile about you.
Security risks: Some websites use HTTPS with HSTS (HTTP Strict Transport Security) to ensure encrypted connections. However, if your DNS requests are leaked, an attacker could use DNS hijacking techniques to redirect you to a malicious website version, bypassing the HTTPS protection.
How to do the DNS leak test?
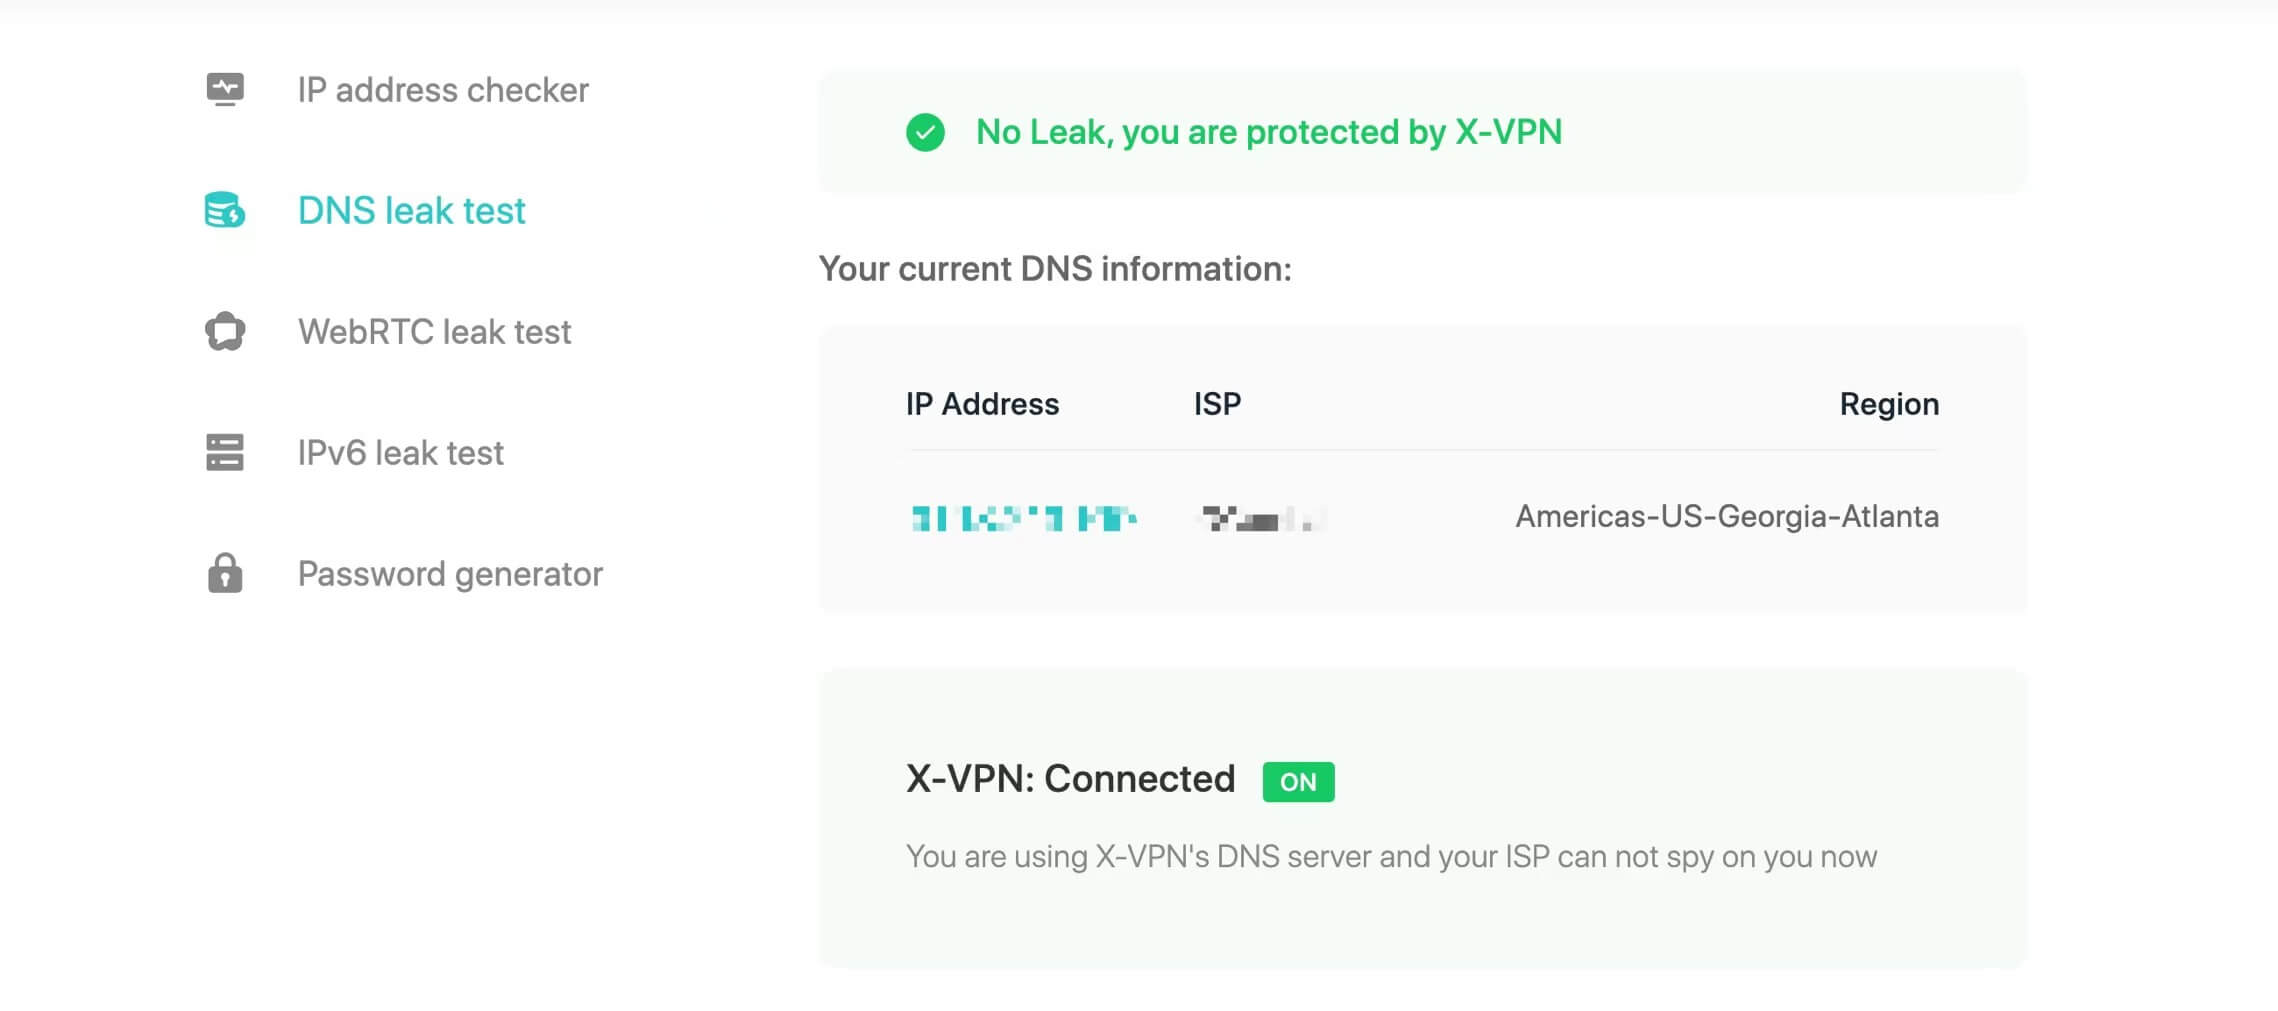
1.Check your IP address: Before proceeding with the DNS leak test, check your current IP address without the VPN. You can search "What is my IP address" on a search engine to find your public IP.
2. Connect to VPN: Then connect to your VPN service of choice on your device. Ensure that the VPN is active and running correctly.
3. Visit X-VPN Security Tools page and choose DNS Leak Test. We have step-by-step guide on this page.
4. Check the results: If the IP address displayed is different from your ISP-assigned IP address, it generally means that the VPN is using its own DNS server. It indicates that DNS requests are being securely handled by the VPN, and there is no DNS leak. And you can see "No leak, you are protected by X-VPN" on the above if you're connected to X-VPN.
🙌 BONUS: We've launched more easy-to-use security tools on this page, including IP address checker, WebRTC leak test, IPv6 leak test, and Password generator. More cool tools are on their way. We're more than happy to invite you to explore them.
How to prevent DNS leak?
1. Choose a reliable VPN: Opt for a reputable VPN service that explicitly mentions DNS leak protection as one of its features. Most reputable VPNs offer DNS leak default protection settings within the apps.
2. Use OpenDNS or Google DNS: Some VPNs allow you to configure the DNS servers manually. Set your DNS servers to trusted options like OpenDNS (208.67.222.222 and 208.67.220.220) or Google DNS (8.8.8.8 and 8.8.4.4). These servers are generally more secure and less likely to leak.
3. Disable teredo: Teredo is a technology used for IPv6 transition. It can sometimes cause DNS leaks. You can disable Teredo through the Command Prompt or PowerShell on Windows.
4. Disable WebRTC: Web Real-Time Communication (WebRTC) can sometimes leak your local IP address, even when using a VPN. Some VPN providers offer built-in WebRTC leak protection, or you can use browser extensions to disable WebRTC.
5. Regularly update and monitor: Keep your VPN software updated to the latest version. Periodically run DNS leak tests to check for any potential leaks.
To prevent DNS leaks, choose a reputable VPN provider with built-in DNS leak protection. Additionally, you can test your VPN for DNS leaks using various online tools and take measures to manually configure your device's DNS settings to avoid any leaks. Always stay vigilant about your online privacy and security, and regularly review your VPN's settings and features.

Benjamin Hartley
Benjamin Hartley is a cybersecurity and tech news writer deeply passionate about digital privacy. Through his work, Benjamin aims to empower individuals to control their own data. When not unraveling VPN complexities, he finds joy in salsa dancing and explores literature, all while striving to simplify online privacy and security for everyone.
Follow Us on Social Media

Recent Articles
Top 10 Soap2Day Alternatives That Work Today [2024 List]
Apr 26, 2024 | 11 mins to readHow to Access Poki Unblocked Games? Free & Safe!
Apr 22, 2024 | 8 mins to readPlay Unblocked Games 67🕹2024 Newest Guide
Apr 18, 2024 | 7 mins to readBest 5 Web Browsers for iPhone and Android 2024
Apr 16, 2024 | 9 mins to readAccess anything anywhere anonymously with X-VPN
24/7 one-one live chat support
Ultimate protection for 5 devices
Access to all worldwide contents
8000+ servers at 225 locations
30-DAY MONEY-BACK GUARANTEE